Quarve
Quarve is in pre-alpha. Use at your own risk
Quarve is an experimental rust UI library for desktop applications. It was made to develop Monocurl, a mathematical animation app, but can be used more generally.
Example
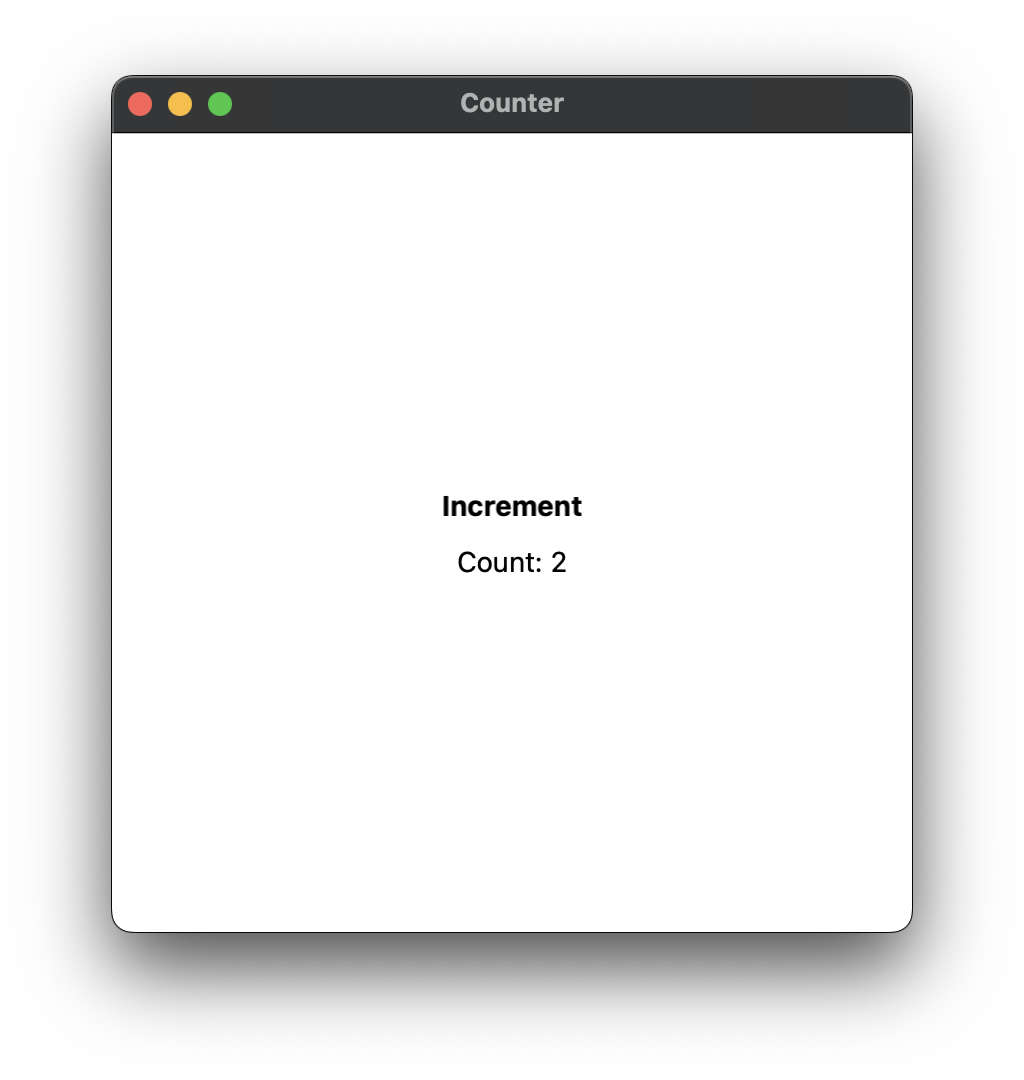
Button and counter example. For fully running examples, please check out the git repository.
#![allow(unused)]
fn main() {
fn counter(s: MSlock) -> impl IVP {
    // state
    let count = Store::new(0);
    let count_binding = count.binding();
    let count_label = count.map(|c| format!("Count: {:?}", c), s);

    // views
    let button = button("Increment", move |s| {
        count_binding.apply(NumericAction::Incr(1), s);
    });
    let display = Text::from_signal(count_label);

    vstack()
        .push(button.bold())
        .push(display)
        .text_color(BLACK)
        .frame(F.intrinsic(400, 400).unlimited_stretch())
        .background(WHITE)
}
}
Preview
Installation
After installing cargo, run
cargo install quarve_cli
You can then create a Quarve project with the command
quarve new <name>.
For certain OSes, you may have to perform additional steps. See setup for relevant information.
Run the project either by running it as a normal rust binary
or by using quarve run.
Design Principles
We designed Quarve to satisfy the core principles:
- Multithreaded Quarve extends rust's fearless concurrency to multithreaded app development.
- Declarative We aim to make the syntax of Quarve convenient to read, without overly relying on macros. Quarve also follows the pattern of composability, allowing for reusable and easy-to-understand code.
- Rust-first As opposed to being a port of a UI library designed for another language, Quarve is built around the features that define Rust: monomorphism, thread safety, composition, speed, and more.
- Native Quarve views are native-backed, avoiding web browsers and gpu renderers. This allows for small installation size and memory footprint.
- Fast We do not use virtual doms and aim for minimal overheard compared to a fully native application (there is still some work to do).
Currently, Quarve is implemented for macOS, Windows and Linux. There are many features that are yet to be added, but the basics are implemented.
Learning
This book is split into several sections. Rather than reading each section completely one-by-one, we recommend skimming each section until you have an intution of how that part of Quarve works and returning whenever you need to reference details. Nevertheless, make sure to follow along by coding examples!
Documentation is available at docs.rs.
For further learning, we recommend looking through the Monocurl source code as it is the most complex application using Quarve. Simpler examples can be found in the git repository. Otherwise, feel free to ask for help in the Discord server.
Feature State
Here are my personal thoughts about some of the features of Quarve. Remember that this is a work-in-progress crate and should not be considered production ready.
Implemented in an elegant manner
- Layout
- State (some small things to change)
- Undo/Redo
- Environments
- Modifiers
Implemented but minor annoyances
- Event handling
- Textview
- Window and View customization
- Menus
Implemented but major annoyances
- Focusing views
- Many arbitrary controls (e.g. slides) are missing
Not Yet Implemented
- Vector graphics rendering
- Video/audio support
- Many details are missing
Setup
Install Quarve CLI
cargo install quarve_cli
Additional Setup
Cocoa Backend (macOS)
The default backend on macOS builds is Cocoa. For Cocoa, Quarve works out of the box and you do not have to perform additional setup.
Qt Backend (Windows/Linux/macOS)
The default backend on Windows and Linux builds is Qt, which you will have to install. Optionally for macOS builds, you can request Quarve use Qt instead of Cocoa.
Windows: Install Qt using msvc2022 (make sure you have visual studio installed).
- Set the environment variable
QUARVE_BACKEND_PATHto the root of Qt installation. E.g.C:\Qt\6.8.1\msvc2022_64. - Append the binaries folder to your
PATH. E.g.C:\Qt\6.8.1\msvc2022_64\bin.
Linux: Install Qt
- Set the environment variable
QUARVE_BACKEND_PATHto the root of Qt installation. E.g.~/Qt/6.8.1/gcc_64. - Append the library folder to to your e
PATH. E.g.~/Qt/6.8.1/gcc_64/bin/
macOS: Install Qt
- Add the
qt_backendfeature to quarve. - Set the environment variable
QUARVE_BACKEND_PATHto the root of Qt installation. E.g.~/Applications/Qt/6.8.1/macos. - Add the following to your
build.rs
#![allow(unused)]
fn main() {
// this is only necessary for local builds
// feel free to disable for release
#[cfg(target_os = "macos")]
{
    let mut qt_path = std::env::var("QUARVE_BACKEND_PATH").unwrap();
    qt_path += "lib/";

    println!("cargo:rustc-link-arg=-Wl,-rpath,{}", qt_path);
}
}
Create new project
quarve new <project_name>
It may be helpful for beginners to include the quarve prelude to access commonly used constants, modules, functions, and traits without having to explicitly import them. This is optional, though.
#![allow(unused)]
fn main() {
use quarve::prelude::*
}
Run project
You can run the project just like any other rust binary, or use the following command:
quarve run
# for workspaces, you may have to explicitly specify the name of the crate
quarve run -n <crate_name>
Deploy Project
Quarve technically has some support of bundling, but it's extremely low so realistically (for now at least) you will have to do a bit of work yourself for final packaging.
quarve deploy
# for workspaces, you may have to explicitly specify the name of the crate
quarve deploy -n <crate_name>
After deploying, a target application will be created in the quarve_target directory.
As of now, we do not know do executable packing so for Windows you will have to do to that yourself (and may want to change directory structure as well).
For Linux, unfortunately all that is done at the moment is
creating the directory structure that quarve expects upon installation.
It's up to you to create the .deb or .rpm files from here. Important:
in your package manager file, make sure to set a dependency for
Qt (rpm: qt6-qtbase or deb: qt6-base (>= 6.0))
See rpm tutorial and/or
deb tutorial for basics.
For macOS, you may have to update the Info.plist file to
e.g. customize the application icon. Depending on your intended distribution style,
you may have to codesign the application yourself too.
Debugging
On Linux, if you get the error that <Gl/gl.h> is not found (or something similar),
it means that you must install the OpenGL dev kit.
View Providers
This lesson explains many of the core concepts of Quarve and is hence slightly long. However, we still recommend reading (at the very least, upto and including IntoViewProvider) as it's important!
Rendered elements in Quarve are called views. A view has two components: a native backing and a view provider. The native backing is simply a reference to a native GUI element. On the other hand, the view provider is responsible for controlling the backing and appropriately filling it with content (somewhat akin to the controller in the MVC paradigm if that helps).
Most of the time, you don't actually have to code your own view provider, but instead reuse existing ones. Consequently, rather than implementing the ViewProvider trait, you will more likely implement the IntoViewProvider trait (abbreviated IVP).
Let's take a concrete example to highlight the distinction. Here, we have a user profile that does not know how to control a view, however, it does not know how to convert itself into something that does. Hence, it's an IVP.
#![allow(unused)]
fn main() {
struct Profile {
    name: String,
    color: Color,
    image: Resource,
}

impl IntoViewProvider<Env> for Profile {
    type UpContext = ();
    type DownContext = ();

    fn into_view_provider(self, env: &Env::Const, s: MSlock) -> impl ViewProvider<Env, UpContext=Self::UpContext, DownContext=Self::DownContext> {
        hstack()
            .push(
                ImageView::new(self.image)
                    .intrinsic(30, 30)
                    .padding(5)
            )
            .push(text(self.name))
            .padding(5)
            .layer(L.bg_color(self.color).radius(4))
            // notice how we use other IVPs
            // before we actually construct our view provider
            .into_view_provider(env, s)
    }
}
}
As another example, while a color (such as BLACK) does not know how to control a view,
it knows how to convert itself into a ViewProvider that appropriately displays
a black view. Hence, all colors are IVPs.
IntoViewProvider
In general, you will interact with IntoViewProvider much more than
ViewProvider. Because it's typed so much, the default quarve project
contains a trait alias as IVP.
As other projects in Rust and declarative UI frameworks, Quarve massively builds on the principle of composition through reusable view components.
There are two principle ways to create such components. One way, which we just
saw with the user profile example is to create a struct and manually
implement the IntoViewProvider trait yourself.
Another way is to simply use functions. Here's a translation of the above profile into a functional component.
#![allow(unused)]
fn main() {
fn profile(name: String, image: Resource, color: Color) -> impl IVP {
    hstack()
        .push(
            ImageView::new(image)
                .intrinsic(30, 30)
                .padding(5)
        )
        .push(text(name))
        .padding(5)
        .layer(L.bg_color(color).radius(4))
}
}
*Technical Note: The downside of the functional approach is that you don't have access
to the MSlock or Env (explained in later lessons).
However, in some cases you can use the ivp_using function if this issue ever arises,
which gives you access to the additional context (this too has some downsides
since the given lambda has to be static).
Finally, you actually specify the root IVP in the WindowProvider::root function.
This should be easy to find in the default project.
Note that the UpContext and DownContext associated types of IntoViewProvider are related to ways of passing information between and from the superview. Don't worry about them too much, they are explained more in the next section.
ViewProvider
Most of the time, you never have to actually implement a full view provider yourself, but sometimes you may have to implement parts of it (i.e. delegate rest of the methods to an existing view provider). It's also good to know the general layout model.
The ViewProvider has a few main roles (there are other minor things it does, such as modifying environment).
- To create and properly manage the native backing
- To add subviews and properly lay them out
- To respond to system and lifecycle events
- To give proper sizing hints to the parent view so that it can layout this view
Init Backing
The init backing function takes the following signature. It will be called once per view_provider. Views can be removed and added from the view tree. In this case, note that init_backing will not be called on the subsequent mounts (so do not use it in that way, there are other ways for this).
#![allow(unused)]
fn main() {
fn init_backing(&mut self, invalidator: WeakInvalidator<E>, subtree: &mut Subtree<E>, backing_source: Option<(NativeView, Self)>, env: &mut EnvRef<E>, s: MSlock) -> NativeView;
}
This may seem quite complex, but we'll break down the individual pieces:
invalidatorgives you a weak (in the Arc sense) reference to an invalidator. The invalidator is used to mark the state of this view as dirty, thereby causing a relayout.subtreegives you a handle by which you can add or remove subviews (among other roles)backing_sourceis something more unique to Quarve. The idea is that sometimes we are creating a view provider to replace an existing view, and we can therefore steal the replaced view's resources rather than having to recreate them. (similar in premise to a RecyclerView)envis not super important for now. The environment is explained more in the Environment lesson.sthe state lock is also explained more in the next lesson, but for now just think about it as a marker showing we're on the main thread
Here's an example of an init_backing of a LayerView. It uses some things
we haven't talked about, but hopefully the general flow makes sense.
#![allow(unused)]
fn main() {
fn init_backing(&mut self, invalidator: WeakInvalidator<E>, subtree: &mut Subtree<E>, backing_source: Option<(NativeView, Self)>, env: &mut EnvRef<E>, s: MSlock) -> NativeView {
    // whenever any of the properties of the layer
    // have changed, invalidate the state of this view
    self.layer.opacity.add_invalidator(&invalidator, s);
    self.layer.border_width.add_invalidator(&invalidator, s);
    self.layer.border_color.add_invalidator(&invalidator, s);
    self.layer.corner_radius.add_invalidator(&invalidator, s);
    self.layer.background_color.add_invalidator(&invalidator, s);

    if let Some((nv, layer)) = backing_source {
        // we are replacing an old view provider
        // so we should reuse the native view

        // it's extremely important
        // that we call this function
        // which basically recursively asks our subview
        // to reuse the backing of the old view
        // if we don't call it, the entire subtree will
        // create a brand new backing for no reason
        self.view.take_backing(layer.view, env, s);
        subtree.push_subview(&self.view, env, s);

        self.backing = nv.backing();
        nv
    }
    else {
        // this is you how you add subviews
        subtree.push_subview(&self.view, env, s);

        let nv = NativeView::layer_view(s);
        self.backing = nv.backing();
        nv
    }
}
}
Layout Model
Quarve follows a unique layout model that is meant to be fast yet still able to achieve complex paradigms. The idea is that there are two passes:
- In the up phase, view providers calculate their 'preferred' sizes in a bottom-up manner. In addition, view providers update their native backing to reflect any state changes that may have occured since the last layout.
- In the down phase, sizes are finalized in a top-down manner.
Up-Phase
As mentioned, the entire job of the up-phase is to calculate the preferred size of this view and any other context the superview may need to layout the current view. Also, this is another place that you can add or remove subviews.
Here is the signature of the layout up method. Note that it returns a boolean. This is because whenever a view provider finishes its up phase, sometimes this view has changed its preferred size. In this case, we Concretely, if this view provider returns true, Quarve effectively invalidates the super view and asks it to perform its up phase as well. If we return false, quarve assumes that there are no changes in preferred sizes so it will not ask the superview to layout up (unless it was invalidated for other reasons)..
#![allow(unused)]
fn main() {
fn layout_up(&mut self, subtree: &mut Subtree<E>, env: &mut EnvRef<E>, s: MSlock) -> bool;
}
Here's how the LayerView layout up function looks like.
#![allow(unused)]
fn main() {
fn layout_up(&mut self, _subtree: &mut Subtree<E>, _env: &mut EnvRef<E>, s: MSlock) -> bool {
  // updates the native backing
  // In this case, we don't
  native::view::layer::update_layer_view(
      self.backing,
      self.layer.background_color.inner(s),
      self.layer.border_color.inner(s),
      self.layer.corner_radius.inner(s) as f64,
      self.layer.border_width.inner(s) as f64,
      self.layer.opacity.inner(s),
      s
  );

  // generally only called if subview propagated to here
  true
}
}
The preferred sizes we are talking about are intrinsic, xsquished,
xstretched, ysquished, and ystretched (if you are lazy, you can set
all of the sizes to the same value).
The expectation is that after
a view provider has its layout up called, all of these values are fully prepared
and a superview can treat them as representing the current state.
In particular, you must return the appropriate value in each of these functions:
#![allow(unused)]
fn main() {
fn intrinsic_size(&mut self, s: MSlock) -> Size;
fn xsquished_size(&mut self, s: MSlock) -> Size;
fn xstretched_size(&mut self, s: MSlock) -> Size;
fn ysquished_size(&mut self, s: MSlock) -> Size;
fn ystretched_size(&mut self, s: MSlock) -> Size;
}
LayoutDown
In the down phase, we are guaranteed that all of the subviews have their preferred sizes finalized. Also, we are given a suggested size by the superview. Using all of this information, we can finalize a size for ourselves, and suggest a size and location for each of our subviews. It's possible that subviews may somewhat alter our suggestion, but generally when this happens the subview only uses a portion of the suggested rect.
Important: In the layout down method, the view provider must then call layout down method of all of its subviews. Otherwise, you may observe weird behavior.
Here's an example layout down method for an HSplit view, which adds
a splitter between two views so you can resize it horizontally. To better understand it,
here are a couple notes about geometry:
- Quarve uses a coordinate system where (0,0) is the top left.
- In the layout down method, you can imagine that you are given an infinitely wide canvas. The frame parameter is a hint that your content should be included in the (0, 0) to (frame.w, frame.h) rectangle, but is not a strict hint. The final exclusion rectangle, the final view rectangle, and the subview rectangles can all be thought of as being placed on this infinite canvas.
- You can also go to negative positions, if necessary.
#![allow(unused)]
fn main() {
fn layout_down(&mut self, _subtree: &Subtree<E>, frame: Size, layout_context: &Self::DownContext, env: &mut EnvRef<E>, s: MSlock) -> (Rect, Rect) {
    // use subview information to determine
    // the min and max range of the splitter
    let (min, max) = if self.is_horizontal {
        (self.lead.xsquished_size(s).w, self.lead.xstretched_size(s).w)
    } else {
        (self.lead.ysquished_size(s).w, self.lead.ystretched_size(s).w)
    };
    // the position of the splitter
    let pos = (self.splitter.up_context(s) - BAR_WIDTH / 2.0)
        .clamp(min, max);

    if self.is_horizontal {
        // position the left and right subviews
        // as well as the splitter

        // methods such as these return the actual
        // used rectangle. We're not using it here
        self.lead.layout_down_with_context(
            Rect::new(0.0, 0.0, pos, frame.h),
            layout_context, env, s);

        // see below for what context means
        // feel free to ignore as this is isn't even
        // a great use case of it
        let ctx = pos + BAR_WIDTH / 2.0;
        self.splitter.layout_down_with_context(
            Rect::new(pos + BAR_WIDTH / 2.0 - self.splitter_size / 2.0, 0.0, self.splitter_size, frame.h),
            &ctx,
            env, s
        );
        self.trail.layout_down_with_context(
            Rect::new(pos + BAR_WIDTH, 0.0, frame.w - pos - BAR_WIDTH, frame.h),
            layout_context, env, s);
    }
    else { /* vertical case is similar and omitted */ }

    // the first value is the used rectangle of just our view
    // which is used by quarve to set the size and position of native backing
    // the second value is the "excluded" area that the
    // superview should treat this subtree as taking up
    // (so that it does not allot it to other siblings)
    // the superview only sees the second value
    // (in its own coordinate system)

    // in this case we use the entire suggestion
    (frame.full_rect(), frame.full_rect())
}
}
There are many other features of layout down that are not included in this example. This includes using the return value of layout down of the children and retranslating them. Nevertheless, this example is more typical of the complexity you are likely to see.
Context (Advanced)
Sometimes, the given size information is not enough for a superview
to make a decision about how to layout its subviews
(as is the case with flex layouts for example).
For this, we have UpContext. It is an associated type of a ViewProvider that specifies
the type of information we're going to provide to the superview.
As with the sizes, the expectation is that
after layout_up has been called, the up_context method returns an up-to-date
result.
In the vast majority of cases, you can set the UpContext to ().
#![allow(unused)]
fn main() {
fn up_context(&mut self, s: MSlock) -> Self::UpContext;
}
On the other hand, sometimes the suggested frame is not enough to make a decision
about how to layout our current view, and we would like more information from our parent.
In this case, we can set the DownContext type to the required context we desire.
Again in the vast majority of cases, you can set DownContext to ().
Do note that setting a non-trivial DownContext means that some caching
can't be done, but this is only a minor peformance hit.
Finally, note that for IVPs, their UpContext and DownContext associated types are exactly those of the ViewProvider they convert to.
Event Handling
Some of the methods of a view provider are related to events.
There is a collection of life cycle events. These are described in further detail in the Modifiers lesson.
#![allow(unused)]
fn main() {
fn pre_show(&mut self, s: MSlock) {

}

fn post_show(&mut self, s: MSlock) {

}

fn pre_hide(&mut self, s: MSlock) {

}

fn post_hide(&mut self, s: MSlock) {

}
}
Also, you can respond to OS events. In general, here is how event dispatch works:
- If the event is a mouse event and there is a focused view, dispatch to that view. If that view consumes the event, stop.
- Otherwise, if the event is a mouse event, dispatch the event to all views that the cursor is on top of, stopping if any view consumes the event.
- If the event is a key event and there is a focused view, dispatch to that view. Continue dispatching even if the view says to consume the event.
- If the event is a key event dispatch to all key listeners, except the focused view if it was already dispatched to.
- If we reach this branch, it's delegated back to the native system for dispatch.
In particular, you may want to register to become first responder if you care
about mouse events happening outside of your boundary (which you can do so by
return EventResult::FocusAcquire)
Here is a (partially incomplete) example of a button event handler.
#![allow(unused)]
fn main() {
fn handle_event(&self, e: &Event, s: MSlock) -> EventResult {
    if !e.is_mouse() {
        return EventResult::NotHandled;
    }

    let cursor = e.cursor();
    // it could be outside since we're focused
    let inside = cursor.x >= 0.0 && cursor.x < self.last_size.w &&
    cursor.y >= 0.0 && cursor.y < self.last_size.h;
    if inside != *self.is_hover.borrow(s) {
        self.is_hover.apply(SetAction::Set(inside), s);
    }

    if !inside || matches!(&e.payload, EventPayload::Mouse(MouseEvent::LeftUp, _)) {
        if *self.is_click.borrow(s) {
            self.is_click.apply(SetAction::Set(false), s);
            // end of click; relenquish focus
            return EventResult::FocusRelease;
        }
    } else if inside && matches!(&e.payload, EventPayload::Mouse(MouseEvent::LeftDown, _)) {
        if !*self.is_click.borrow(s) {
            (self.action)(s);

            self.is_click.apply(SetAction::Set(true), s);
            // acquire focus so we can receive
            // events even if moved outside
            return EventResult::FocusAcquire;
        }
    }

    return EventResult::NotHandled
}
}
I'm not 100% on keeping this system as there are a few quirks, but it hasn't been a major issue thus far.
Examples
There are tons of examples of implementing view providers in the standard library. We recommend looking at the source code whenever needed (although, some view providers use internal-only functions).
Cheat Sheet
Some concepts are mentioned in more detail in later lessons. Treat this lesson more as a 'cheat sheet' of good to know methods rather than a full explanation.
Views
Construct basic text with the text function located in the prelude.
#![allow(unused)]
fn main() {
text("rabbit")
}
Display image
#![allow(unused)]
fn main() {
ImageView::new("path_to_resource_in_res_folder")
}
All colors are IVPs (usually you want to set a size, hence the second line)
#![allow(unused)]
fn main() {
BLACK
    .intrinsic(100, 100)
}
Dropdown Menu
#![allow(unused)]
fn main() {
let selection = Store::new(None);

Dropdown::new(selection.binding())
    .option("Alpha")
    .option("Beta");
}
TextField
#![allow(unused)]
fn main() {
let text = Store::new("initial".into());
TextField::new(text.binding());
}
Text Button
#![allow(unused)]
fn main() {
button("Label", |s| { /* action */ })
}
*There are many controls that one would expect from a UI library that are yet to be added. I apologize for this and may add them in the future if there is interest.
Layouts
You can use a vstack, hstack, or zstack to organize content easily.
There are also flex layouts, but these are needed less.
You can either layout heterogenous data known at compile time,or dynamically based off of bindings and signals.
#![allow(unused)]
fn main() {
// hetereogenous
vstack()
    .push(ivp1)
    .push(ivp2)

// vector binding to vstack
binding.binding_vmap(|content| text(content.to_string());

// vector signal to vstack (slow)
signal.sig_vmap(|content| text(content.to_string());
}
Modifiers
Apply padding to an ivp
#![allow(unused)]
fn main() {
ivp
    .padding(amount)
}
Offset the ivp by some amount
#![allow(unused)]
fn main() {
ivp
    .offset(dx, dy)
}
Set the intrinsic size, essentially allocating a rectangle of space.
#![allow(unused)]
fn main() {
ivp
    .intrinsic(width, height)
// shorthand for .frame(F.intrinsic(width, height))
}
Setting text attributes
#![allow(unused)]
fn main() {
ivp
    .text_font("font_file_in_res/font")
    .text_size(size)
    .text_color(color)
}
Set the background color
#![allow(unused)]
fn main() {
ivp
    .bg_color(COLOR)
}
Add a foreground view
#![allow(unused)]
fn main() {
ivp
    .foreground(attraction)
}
Add a background view
#![allow(unused)]
fn main() {
ivp
    .background(attraction)
}
Lifecycle methods
#![allow(unused)]
fn main() {
ivp
    .pre_show(|s| { ... }) // called before children and before being shown
    .post_show(|s| { ... }) // called after children and after being shown
    .pre_hide(|s| { ... }) // called before children and before being hidden
    .post_hide(|s| { ... }) // called after children and after being hidden
}
Conditional
if else
#![allow(unused)]
fn main() {
view_if(condition_signal, IVP1)
    .view_else(IVP2)
}
view match
#![allow(unused)]
fn main() {
view_match!(signal;
    0 => arm1ivp,
    1 => arm2ivp,
    _ => default_arm_ivp
);
}
State
This lesson is also a bit long. The important parts are the state lock, signals, stores and bindings. You can come back to the other parts after finishing the rest of the lessons.
Remark: Some of the terminology of the state system comes from Group theory (e.g. Word, GroupAction).
State Lock
Most native UI libraries have some operations that can only be performed on the main thread. Unfortunately, this is often unchecked completely or checked at runtime. Quarve uses Rust's ownership mechanics to check most of this at compile time.
The idea is that there is a global state lock that only one thread at a time can
hold. Any thread which wants to update or read from the state must acquire the
state lock (often abbreviated 'slock'). To prove that the caller of a certain
function must be holding this lock, you can simply add as an argument
s: Slock, which is a marker that can only be acquired if you are in fact the
holder.
There are two types of slocks.
Slock<MainThreadMarker>which is abbreviatedMSlock.Slock<AnyThreadMarker>which is abbreviatedSlock.
Note that you can freely convert slocks of the first kind to the second kind
using .to_general_slock, which is occasionally necessary. However, converting
the second kind to the first kind fails if you're not on the main thread.
Consequently, many methods in the Quarve library take as argument
either Slock<impl ThreadMarker>, denoting only the state lock is necessary,
or MSlock>, denoting the state lock is necessary and this function
must be called on the main thread.
Advanced: For simple applications, you likely only pass the slock marker
and delegate actually acquiring the lock to the caller of your function
(which will typically be quarve).
However, to explicitly acquire the state locker yourself (as is necessary
for worker threads), you can use the slock_owner function
From here, you can get the actual state lock markers using the marker function.
Remark: Conventional wisdom argues against having a global state lock as it may reduce parallelism. However, we believe that in the vast majority of cases only the main thread will hold the lock and worker threads only need to hold it for a very short time when they perform the state transformation. Also, the state lcok greatly reduces race conditions as well. Finally, we avoid the cost of constantly acquiring and releasing mutexes. Hence, we believe that in many cases the tradeoff is worth it.
Signals
Signals are simply values that change over time. Moreover, receivers
can get notified after the value is updated. Note that Signal
is a trait, and its value takes the associated type Target.
For instance, quarve provides clock_signal function that is simply
a signal that continuously increases with time. Here's an example of
how we can apply a listener.
#![allow(unused)]
fn main() {
fn run(s: MSlock) {
    let sig = clock_signal(s);
    sig.listen(|val, s| {
        println("Time is {}", val);
        true
    }, s);

    // you can also query the current value of a signal
    // using the borrow method
    // note that this requires the state lock as well
    let curr = *sig.borrow(s);
}
}
Notice that signal listeners are given the state lock as a parameter,
and you can only add listeners if you have the state lock.
Listeners also should return a boolean value denoting whether they
want to continue listening or should be dropped.
In the above example, we want to listen forever so we always
return true. In many cases, you return false once a weak
reference can no longer be upgraded.
By default, listen gives a notification for all possible updates,
even when the 'new' value is the same as the old one.
If you would only like to get notifications for true changes, you can use
diff_listen instead (this requires the target to implement PartialEq).
Store
The heart of state is a Store. Conceptually, a store simply
stores a particular value and notifies to its observers whenever it changes.
In this aspect, it's a signal. However, unlike a signal, a Store can also
be changed arbitrarily by users.
In the simplest case, this change is done by manually overwriting the current value.
#![allow(unused)]
fn main() {
let store = Store::new(0);
// notice the usage of the state lock
// Here, we apply the SetAction::Set action to modify the current value
store.apply(Set(4), s);

// you can acquire a signal from a store explicitly
// sig: impl Signal<Target=i32> + Clone
let sig = store.signal();

// or you can add listeners directly to the store
store.listen(|val, s| {
    ...
    true
}, s);
}
The advantage of having the action be an actual struct passed in (as opposed to e.g. some function on the object) is that now observers can see the exact transformation that was applied, which can be surprisingly useful.
For many types, such as integers and floats, the 'action' of how you change the value is simply setting it. However, this is not always the case. For instance, the action for a vector is a sequence of inserts or removals.
#![allow(unused)]
fn main() {
let store = Store::new(vec![Store::new(false)]);

// for store of vectors,
// it may not be obvious why we need the inner store
// (in addition to the outer one)
// you can think about it as the top level store lets us observe
// if elements are added or deleted, but doesn't know if they're modified
// the individual sub stores allow observes to see if any particular
// element of the vector is modified
store.apply([
    VecActionBasis::Insert(Store::new(false), 0),
    VecActionBasis::Remove(1)
], s);
}
Again, the advantage is that now an observer is not only notified that the vector will change, but they can see exactly how it will be changed by looking at the action. This can, for example, figure out how to efficiently undo the action or possibly mirror the action onto another vector.
Binding
In particular, in addition to being a signal, stores also implement
the Binding trait. The Binding trait is subtrait of Signal,
further specifying that you must be able to change the current
value using an action (as was seen above), and add an action_listener.
An action listener gets notified every time a store is about to change (in contrast, regular listeners are notified afterwards). It is given the current value, the action, and the state lock.
#![allow(unused)]
fn main() {
let store = Store::new(vec![Store::new(false)]);
// see below for why the different syntax wrt to signal
// b: impl Binding<Filterless<Vec<bool>> + Clone
let b = store.binding();

// here we call action listen on the binding
// but you could've just called it on the store itself
b.action_listen(|val, action, s| {
    /* act appropriately */

    // again, return a value based on whether we want to continue
    // listening
    true
}, s);

}
Finally, we note that Store implements Binding but does not
implement Clone. If you would like a cloneable binding,
explicitly call the binding method on the store.
(likewise, for a cloneable signal, use the signal method).
Also note that Stores are internally arc-ed. In particular,
even if the original Store is dropped but one of the bindings
is still alive, you can still use the bindings as they hold strong references.
You can instead call weak_binding to only hold a weak reference.
Note: There is a slight asymmetry between impl Signal<Target=T>
and impl Binding<Filterless<T>>.
The filterless part is basically for something
that didn't really end up getting used but is still a part of quarve.
It may be used in the future, though.
Store Container
In any actual UI application, the main state is not simply a single
store, but rather a collection of them. We would like to organize such stores
into containers. The quarve_derive crate provides a utility to automatically
derive StoreContainer.
#![allow(unused)]
fn main() {
#[derive(StoreContainer)]
struct ApplicationState
    // non stores should be ignored
    #[quarve(ignore)]
    app_name: String,

    count: Store<usize>,
    shopping_cart: Store<Vec<Item>>,
    // store containers can hold other store containers
    // (assume that UserState is some other StoreContainer)
    user: UserState
}
}
In addition to grouping together state, StoreContainers provide the the functionality of adding a listener to see when any contained store changes. As we'll soon see, StoreContainers also are used for adding undo/redo support.
#![allow(unused)]

fn main() {
let a = ApplicationState::new(/* snip */);
// note that only one subtree general listener
// can ever be present at any given time
a.subtree_general_listener(|s| {
    // note that we are not explicitly told which
    // sub container is changed
    true
}, s);
}
Quarve also provides StoreContainerSource and StoreContainerView
to add arc funtionality to store containers, if needed.
Undo
Quarve makes it easy to add undo support. Place all stores that
should be undoable under some StoreContainer. Then, simply
create an UndoManager and call mount_undo_manager on
the target IVP. Whenever the IVP is mounted on the view
hierarchy (i.e. visible), you will be able to undo any action.
#![allow(unused)]
fn main() {
fn root(&self, env: &<Env as Environment>::Const, s: MSlock) -> impl ViewProvider<Env, DownContext=()> {
    let a = ApplicationState::new(/* snip */);
    // specify the store container
    let u = UndoManager::new(&a, s);

    ivp
        .mount_undo_manager(u)
        .into_view_provider(env, s)
}
}
TODO (advanced) mention undo grouping, undo bucket and history_elide
Derived Store
TODO add more details here However, sometimes we want to explicitly exclude a Store from undo operations. This usually happens because a Store is not actually independent of other stores, but is instead a function of them (i.e. its value is 'derived' from other stores). Concretely, let's suppose that we have two stores. One is a counter, and another is a double counter that always (toy example, you can imagine that actual conversion to be much more complex).
#![allow(unused)]
fn main() {
let a = Store::new(0);
let b = Store::new(0);

// always update b
let binding = b.binding();
a.listen(move |val, s| {
    binding.apply(Set(2 * val), s);
    true
}, s);
}
In such a case, let's suppose somewhere that a is updated
to 1. Following this, b will be updated to 2.
When we request an undo, we will revert the most recent action,
so b will go back to 0. Then, we will set back a to 0.
Since a was changed, all listeners will be invoked,
so b will again be set to 0. This last operation is redundant,
and we could've simply gotten away with never undoing
the action for b in the first place. Hence, it makes more sense
to mark b as a DerivedStore that should not partake
in undo operations.
You can imagine this becomes much more problematic when b is
trying to mirror the actions of a (that aren't simply SetActions,
think of a vector).
In this case, applying the inverse action twice will lead
to incorrect behavior!
Stateful
How does quarve know which action type shoul be used for a given store?
The answer is that any item used in the store must implement
the Stateful trait. Part of the Stateful trait is
setting the associated type to the natural action.
Hence, if you want to create a store of some custom type,
you must implement Stateful for the your custom type.
For many cases, you can get away by setting the action
to be SetAction. If necessary, you can instead create
your own action and implement the GroupAction trait
for it.
* Technically, it need not be a 100% proper group action, but it's nearly there.
IntoAction
Sometimes, we may want to perform a modification that isn't naturally thought of as the standard action for some Store. For example, let's suppose we have a counter. It's quite annoying to use a set action to increment since we must first borrow the value.
Hence, we note that Binding::apply actually accepts
a value that implements IntoAction, rather than solely
the standard action of the Store. Consequently, we can create
an IncrementAction struct that implements IntoAction and
be converted into a SetAction. Crucially, note that in the below
signature, we are allowed to look at the target value when performing
the conversion so that we may simply return SetAction::Set(1 + *target).
#![allow(unused)]
fn main() {
fn into_action(self, target: &T) -> A;
}
In fact, NumericAction::Incr exists in the quarve library
and does exactly this.
You can feel free to create your own too though, as you see fit.
Another use case is to simply give syntatic sugar for actions
that are cumbersome to type. For instance,
[VecActionBasis; N] implements IntoAction so that
you can type [VecActionBasis::insert(...)] instead of
Word::new(vec![VecActionBasis::insert(...)]).
Layouts
Types of Layouts
The common types of layouts are vstack, hstack, zstack, and
flexstack. The first three are more or less straightforward, but flexstack
takes from
Heterogenous layouts
For each of these, you can layout a heterogenous collection of elements.
#![allow(unused)]
fn main() {
// vstack() is an alias for VStack::hetero()
VStack::hetero()
    .push(first_view)
    .push(second_view)
    ...
}
Iterator
If you have a collection of items, and for each one you want to display
a view based off of that item,
you can use the vmap, hmap, zmap, and flexmap functions.
Here's a toy example.
#![allow(unused)]
fn main() {
let strings = ["The", "rabbit", "jumped", "over", "the", "moon"];
strings
    .vmap(|string| text(string));
}
Binding
If you have a binding of a vector of data, you can have a layout of the mapped views, which updates automatically as the binding updates.
#![allow(unused)]
fn main() {
let strings: impl Binding<Filterless<Vec<String>>>;
strings
    .binding_vmap(|string| text(string));
}
Signal
Finally, there's the analogous method for signals of vectors. If you can,
try to use binding_vmap or its analogs instead as sig_vmap is significantly
slower.
#![allow(unused)]
fn main() {
let strings: impl Signal<Target=Vec<String>>;
strings
    .sig_vmap(|string| text(string));
}
Using Options
Sometimes you want to customize a vstack to adjust the spacing, for example. This can be done using the options for that layout.
#![allow(unused)]
fn main() {
VStack::hetero_options(
    VStackOptions::default()
        .direction(VerticalDirection::Up)
        .align(HorizontalAlignment::Trailing)
        .spacing(0.0)
)
    .push(...)
// signal
signal.sig_vmap_options(|elem| ...,
    VStackOptions::default()
        .spacing(0.0)
)
// iterator
into_iteratoe.vmap_options(|elem| ...,
    VStackOptions::default()
        .spacing(0.0)
)
// binding
binding.binding_vmap_options(|elem| ...,
    VStackOptions::default()
        .spacing(0.0)
)
}
FlexStack
The behavior of vstack, hstack, and zstack are more or less intuitive,
but flexstack is slightly more complex. It is based off html flexbox
and most features present in the html edition are present here as well.
In the options of the parent view, you can specify things such
as the flex direction, whether it wraps, etc.
For each subview, you can use the flex modifier to set options about how this
specific child should be sized.
#![allow(unused)]
fn main() {
FlexStack::hetero_options(FlexStackOptions::default().gap(0.0))
    .push(
        text("first")
            .frame(F.intrinsic(200, 30).squished(40, 30).unlimited_stretch())
            .border(RED, 1)
            .flex(FlexContext::default().grow(1.0))
    )
    .push(
        text("second block of text")
            .frame(F.intrinsic(100, 30).unlimited_stretch())
            .border(BLUE, 1)
            .flex(FlexContext::default().grow(3.0))
    )
    .push(
        text("final")
            .frame(F.intrinsic(300, 30).unlimited_stretch())
            .border(BLACK, 1)
            .flex(FlexContext::default().grow(0.5))
    );
}
See more options in use in the flex example.
Remark: one of the nice things about Quarve is that
the layout system is general enough that flexstack doesn't
have to be axiomatized,
i.e. flexstack doesn't use any internal-only APIs
so a user using the quarve library could fully recreate flexstack and theoretically
more complex generalizations.
HSplit
You can also easily create a vertical/horizontal split view. It's generally recommended to put each of the left and right into their own frames so that you can be explicit about the minimum and maximum content size.
#![allow(unused)]
fn main() {
HSplit::new(left, right)
}
LayoutProvider
What if you have a set of views and you need to layout the children in
some complex manner. One option is to manually implement view provider
and handle all details of the layout process. However, a slightly easier way
is to implement LayoutProvider instead.
Given any struct that implements layout provider, you can convert it into
a view provider by using the .into_layout_view_provider method.
This handles the native backing automatically. Apart from that, the
methods and layout process is more or less the same as with vanilla ViewProvider
(revisit that lesson if needed).
Note that another common use case of LayoutProvider is to handle mouse events,
which is otherwise difficult to do.
In fact, HSplit and VSplit use a LayoutProvider
under the hood.
VecLayoutProvider (Advanced)
Note that layout providers such as vstack, hstack, zstack, flexstack, etc
can be defined on any number of subviews.
For these, it would be nice to have a simple interface for performing the layout
and automatically creating the relevant hetero, vmap, sig_vmap, etc methods.
Indeed, you can implement the VecLayoutProvider yourself to specify how to layout
an arbitrary number of subviews. To get the relevant methods, quarve provides
a set of macros, such as impl_hetero_layout to make it quite simple.
See how vstack and others are implemented
here
(you may have to scroll quite far, it's in the vec_layout::vstack module)
Conditional
Here we show how to show or hide views conditionally.
If Else
The simplest conditional is the if (and else) block. These statements conditionally hide or show views based on the given boolean signal. Here's the syntax:
#![allow(unused)]
fn main() {
let shown = Store::new(false);
let shown_binding = shown.binding();

hstack()
    .push(button("toggle color", move |s| {
        let curr = *shown_binding.borrow(s);
        shown_binding.apply(SetAction::Set(!curr), s);
    }))
    .push(
        // dont like this syntax that much
        // but i also think a macro would be overkill
        view_if(shown.signal(), BLUE.intrinsic(50, 50))
            // else if would go here
            .view_else(RED.intrinsic(50, 50))
    )
}
View Match
A common paradigm is to only show one view out of a set of views, depending on some
state (think about a router). This can be accomplished by the view_match! macro.
It's conceptually similar to a match statement based upon the value of some signal.
However, a key distinction is that the different arms are allowed to take different
types.
The general syntax is as follows
#![allow(unused)]
fn main() {
view_match!(signal;
    pattern_1 => IVP1,
    pattern_2 => IVP2,
    _ => DEFAULT_IVP
)
// sometimes you don't want to match exactly on the content of a signal
// but rather match on the content of a signal after some initial
// operation
view_match!(signal, |content| mapped_expr;
    pattern_1 => IVP1,
    pattern_2 => IVP2,
    _ => DEFAULT_IVP
)
}
Here's an example:
#![allow(unused)]
fn main() {
fn mux_demo() -> impl IVP {
    let selection = Store::new(None);
    let selection_sig = selection.signal();

    let mux = view_match!(selection_sig, |val: &Option<String>| val.as_ref().map(move |q| q.as_str());
        Some("Alpha") => text("alpha text").bold(),
        Some("Beta") => button("beta button", |_s| println!("clicked!")).italic(),
        _ => text("Please select an option")
    );

    // macro syntax of vstack
    vstack! {
        mux;
        Dropdown::new(selection.binding())
            .option("Alpha")
            .option("Beta");
    }
}
}
The included examples are available in this project.
Modifiers
Modifiers are methods that transform one IVP into another IVP by adding certain functionalities. They are pretty intuitive and allow for complex user interfaces.
We emphasize that the order of modifiers is important. In some cases, code won't even compile if you switch the order.
Positional Modifiers
Apply padding to an ivp
#![allow(unused)]
fn main() {
ivp
    .padding(amount)

// dynamically based on a signal
ivp
    .padding_signal(signal)

// just a single edge
ivp
    .padding_edge(amount, quarve::geo::edge::LEFT | quarve::geo::edge::RIGHT /* or likewise*/)
}
Offset the ivp by some amount
#![allow(unused)]
fn main() {
ivp
    .offset(dx, dy)
// based on a signal
ivp
    .offset_signal(dx_signal, dy_signal)
}
In quarve's positioning model, a view has 5 associated sizes:
intrinsic, xsquished, xstretched, ysquished, ystretched. Layouts such as
vstack use this information to appropriately position their subviews.
Sometimes, you may want to manually specify some of these sizing hints, which is
where the frame modifier comes in. The formal behavior is a bit hard to describe
, but the essense is that you are "placing" the target IVP into the
given frame. If it doesn't fill up the entir content,
you can also specify which alignment to use. (this is inspired by SwiftUI frame).
#![allow(unused)]
fn main() {
ivp
    .frame(F
        .align(Alignment::Leading)
        // set both x squished and y squished
        // note that by default, the squished and stretched size is the same
        // as the intrinsic size
        .squished(100, 100)
        .intrinsic(200, 200)
        .stretched(300, 300)
    )

ivp
    .intrinsic(width, height)
// shorthand for .frame(F.intrinsic(width, height))
}
Visual Modifiers
You can alter many visual properties about a view using the layer modifier
#![allow(unused)]
fn main() {
ivp
    .layer(L
        .bg_color(BLUE)
        .border(RED, 1)
        // corner radius
        .radius(4)
        // for all of these, you can also use signals
        .radius_signal(sig)
    )
// shorthand for border
ivp
    .border(RED, 1)
// shorthand for bg_color
ivp
    .bg_color(RED)
}
Set a cursor for a view
#![allow(unused)]
fn main() {
ivp
    .cursor(Cursor::Pointer)
}
Conditional Modifiers
Sometimes, you may only want to apply modifiers conditionally. For many modifiers of the standard library (but not all), this can be done.
In particular, we can use the when (meta-) modifier that only
applies a set of modifiers conditionally.
#![allow(unused)]
fn main() {
IVP
    .when(cond, |ivp | { ivp
        // positional modifiers
        .offset(100, 100)
        .padding(100)
        .frame(F.intrinsic(100, 100))
        // env modifiers
        .text_color(RED)
        .bold()
        // layer
        .layer(L.bg_color(RED))
        // foreground or background
        .background(RED.layer(L.radius(4)))
        // portals
        .portal_send(&p, BLUE)

        // however, life cycle methods
        // such as .pre_show are not supported
    })
}
Lifecycle Modifiers
You can get notifications for when a view is mounted or unmounted onto the Window. Do note that the same view can be mounted and unmounted multiple times.
#![allow(unused)]
fn main() {
ivp
    .pre_show(|s| { ... }) // called before children and before being shown
    .post_show(|s| { ... }) // called after children and after being shown
    .pre_hide(|s| { ... }) // called before children and before being hidden
    .post_hide(|s| { ... }) // called after children and after being hidden
}
Environment Modifiers
Environment modifiers change properties for the entire subtree of an ivp. The most common ones are related to text.
#![allow(unused)]
fn main() {
vstack()
    .push(text("rabbit"))
    .push(
        text("bunny")
            .bold()
    )
    .push(
        text("strawberry")
            // explicitly override the parent environment modifier
            .text_size(20)
    )
    // set the text size for this entire subtree
    // note that vstack is not even text related,
    // but we can still apply the modifier here!
    .text_size(14)
    .italic()
}
See Environment and Text lessons for more.
Key Listener
You can see whenever keys are pressed via the key listener method, which also tells you the currently active modifiers.
#![allow(unused)]
fn main() {
ivp
    .key_listener(|keys, modifiers, s| {
        println!("Pressed {:?}", keys)
    })
}
Creating your own Modifiers (Advanced)
Rather than fully implementing your own view provider from scratch, you can create a view provider that "wraps" another view provider and delegate most of the view provider methods to the source view provider (composition). Then, for whatever functionality you want to add, you should properly modify the necessary methods. This is one of the advantage of the view provider model: we can append functionality to a view without allocating more native backings (which are really expensive).
Be careful, as if you don't properly call the source view provider method properly, the observed behavior may be unexpected. Also, in addition to creating a wrapping view provider, you typically create an associated wrapping IVP as well.
Example: ShowHide
modifier (you may have to scroll to ShowHide)
Provider Modifier
While this approach works, it to instead recommended to implement
the ProviderModifier. This is less versatile than the
composite approach, but it allows the modifier to be used in when blocks
freely.
To see a full example of this, take a look at the implementation of the
Offset modifier
(you may have to scroll down to find OffsetModifiable and related structs).
Text
Labels
The easiest way to create text is through the text function in the prelude
#![allow(unused)]
fn main() {
text("Rabbit")
}
You can also have a label that dynamically updates based on a signal
#![allow(unused)]
fn main() {
Text::from_signal(signal)
}
TextField
A TextField can be styled similarly to Text. TextField connect their content changes to a binding.
#![allow(unused)]
fn main() {
let text = Store::new("initial".into());
TextField::new(text.binding());
}
I don't like the focus system, but you can control when a TextField is focused
using a TokenStore (this is definitely subject to be changed in the future).
#![allow(unused)]
fn main() {
let focused = TokenStore::new(None);
let text1 = Store::new("alpha".into());
let text2 = Store::new("beta".into());

vstack()
    .push(
        TextField::new(text1.binding())
            .focused_if_eq(focused.binding(), 1)
    )
    .push(
        TextField::new(text2.binding())
            .focused_if_eq(focused.binding(), 2)
    );
}
* Right now there is not that much control over the textfield in terms of its appearance. We hope to possibly improve this in the future.
Environment
You can specify different text settings using environment modifiers, such as below.
These affect Text and TextField views.
#![allow(unused)]
fn main() {
IVP
    .bold()
    .italic()
    .text_font("font_file_in_res/font")
    .text_size(size)
    .text_color(color)
    .text_backcolor(RED)
}
Note that environment modifiers are somewhat different than regular modifiers in that they apply to all subviews rather than just the modifed IVP. See the environment lesson to learn more.
TextView (Advanced)
TODO this section is currently poorly written and lacking much-needed visuals
TextView is a heavy-duty text editor. It works by following an attribute model.
The state of a TextView is comprised of a series of pages. Each page has a series of runs (also called blocks/paragraphs in other frameworks). Each run has a single string of content, with no new lines. In addition, you can store attributes for each page, run, or character. This is useful since, for example, the attributes can be used to style the appeareance and layout of the characters. Moreover, you may simply want to store custom attributes for your own application, irrespective of causing a visual change.
There are two types of attributes: derived and intrinsic. This is analogous to derived and normal stores, namely that the derived attributes can be thought of solely as a function of the text content, but the intrinsic attributes may vary even for the same text content. As an example, an auto markdown formatter would only have derived attributes since the visual display is solely a function of the text. An example of an intrinsic attribute would be something like a rich text editor where we can artificially bold certain content without changing the text. (this description is simplified).
Note that all TextViews layout their content vertically from the first page to the last. Moreover, each page has its own separate native editor (if you don't want this, simply use a single page).
TODO talk about cursor and cursor state
To actually create a TextView, you implement the TextViewProvider trait. Here,
you specify the intrinsic and derived attributes. You also specify
properties about how the TextView is displayed. For instance, you can add a background
to each page. You can also specify run decorations (most notably, attaching a line number
in the gutter of each line) quite easily. Finally, you can attach a decoration
to the cursor, which is useful for displaying an autocomplete window.
As there is a lot of machinery for text views, we omit an inline example and instead refer you to this full example.
Limitations
Currently TextView only supports the same font and font size for the entirety of the text. We only support content modification to be done on the main thread, (attributes can be changed in any thread).
While in theory TextView should be extremely efficient, I need to still do some optimizations to improve performance for certain scenarios. Files <= 1000 lines long should be fine, though.
Portals
To provide some motivation of portals, we note the following two problems with declarative UI libraries (and partially UI libraries in general).
- Typically, the state tree more or less aligns with the view hierarchy, but sometimes there are mismatches. Concretely, suppose a view depends on state so that it makes sense to initialize it deep in the view hierarchy, but layout-wise we want it in the toolbar (which is completely separate in the view hierarchy). This will usually lead to ad-hoc solutions, such as making the state globally accessible.
- Declarative libraries are not great for moving a view around in a view hierarchy. In particular, suppose that in certain cases, we want a view to be positioned in the left hand side of the screen as a popover, but upon clicking a button, it should be displayed in the middle as the main content. This may be solved by having conditional views at each possible location, but that strategy is suboptimal since it does not properly transfer state between locations and is also memory inefficient.
The solution: Portals
How do we provide such an interface in a clean, elegant abstraction? The answer is inspired by Rust's common paradigm of senders and receivers. In particular, the idea is that in one location of the view hierarchy, we will have a portal sender. The sender's job is to provide the portal with created content. In another location, we have the portal receiver. This acts as the "mounting point" for where the view will actually be displayed. Note that the view behaves exactly as if it was placed in the spot of the receiver (i.e. it inherits the receiver's environment, not the sender's).
This solves the first problem since the place where we create the view can now be completely separated from the place where it needs to be mounted.
It also solves the second problem since if we create a new portal receiver (on the same portal) at a new location, the content will be moved towards there.
Example
Here's a (toy) example where we show a way of fixing the first problem.
#![allow(unused)]
fn main() {
pub fn basic_portal() -> impl IVP {
    // create the communication channel
    let p = Portal::new();

    vstack()
        .push(
            // mount the contents on this portal
            // in this example the sender and receiver
            // are in the same function so there's little benefit
            // but in theory they can be very far apart in the view tree
            PortalReceiver::new(&p)
        )
        .push(
            RED.intrinsic(100, 100)
        )
        .push(
            // send a blue view as the content
            // Note that this sender is active only
            // whenever this view is shown
            // not important in this example
            // but sometimes it can be useful
            GREEN
                .intrinsic(100, 100)
                .portal_send(&p, BLUE.intrinsic(100, 100))
        )
}
}
Here's another toy example where we show how the second problem can be fixed.
#![allow(unused)]
fn main() {
pub fn dynamic_portal(s: MSlock) -> impl IVP {
    let p = Portal::new();

    let counter = Store::new(0);
    // imagine more complex conditions for yourself
    let left = counter.map(|c| *c % 2 == 1, s);
    let right = counter.map(|c| *c % 2 == 0, s);

    let text = Store::new("".to_string());

    hstack()
        .push(
            view_if(left, PortalReceiver::new(&p))
                .view_else(BLACK.intrinsic(100, 30))
        )
        .push(
            button("switch", move |s| {
                counter.apply(NumericAction::Incr(1), s)
            })
        )
        .push(
            view_if(right, PortalReceiver::new(&p))
                .view_else(BLACK.intrinsic(100, 30))
        )
        .push(
            // empty view is nice for portal sending
            // since it will never have children
            EmptyView
                .portal_send(&p, TextField::new(text.binding())
                    .border(RED, 1)
                    .intrinsic(100, 30)
                )
        )
}
}
Note that you can only have the portal sender be mounted on an view that has no children. Otherwise, we run the risk of infinite loops while performing layouts.
Final Remarks
Although these are both toy examples, it should hopefully paint the picture of how portals can be powerful. However, we do note that excessive use of portals can cause long layout times and lead to stutter, so use them only if necessary. Specifically, avoid portals within portals within portals. It's (somewhat) okay if the different usages of portals are parallel/sibilings, but nested portals can be especially bad when needing to rerender.
Menus
The current interface does not support every possible operation you may want to do with a menu, but it can do the basics.
MenuButton
You create the menu tree in the menu function of your menu provider. Here,
you typically use the WindowMenu::standard function to initialize menus with
standard menu items. You then provide a Menu, or list of items, for each category
of File, Edit, View, and Help. In a menu, you can manually specify a new button
as follows.
#![allow(unused)]
fn main() {
fn menu(&self, env: &<Self::Environment as Environment>::Const, s: MSlock) -> WindowMenu {
    WindowMenu::standard(
        env,
        Menu::new("File")
            // here we are explicitly adding our own button
            // with its own custom command
            .push(MenuButton::new("New", "N", EventModifiers::default().set_command(), |_s| {
                println!("Clicked menu button");
            })),
        Menu::new("Edit"),
        Menu::new("View"),
        Menu::new("Help"),
        s
    )
}
}
The problem is that often times you do not explicitly know the action to take upfront, as it is dependent on the presence of some views in the view hierarchy. Hence, there is an alternate option as well.
MenuChannel
The MenuChannel interface for menus also adheres to the sender and receiver pattern. It may be wise to visit the portals lesson first if you haven't already. The idea is that when you create a window, each menu item is really a receiver with no action in place. Then, the view hierarchy acts as the sender and provides the appropriate menu with an action. For instance, we could have a "Select All" menu item that initially has no action. Whenever a text field is visible, it enables the "Select All" menu item and populates it with an action to take when the menu item is clicked.
The MenuChannel is an object that acts as the coordinator between the sender and
receiver. Initially, you create the menu channel object and pass it to the recipient menu
and the view that will act as the sender. Note that MenuChannels
are internally ARCed so that you can clone them without hassle.
Here's how it looks to pass the channel to the menu.
#![allow(unused)]
fn main() {
fn menu(&self, env: &<Self::Environment as Environment>::Const, s: MSlock) -> WindowMenu {
    // in practice, this initialization would be done
    // somewhere else (likely in environment initialization)
    // so that we can also give the channel to the views
    // but lets ignore that for sake of example
    let new_mc = MenuChannel::new();

    WindowMenu::standard(
        env,
        Menu::new("File")
            .push(MenuReceiver::new(&new_mc, "New", "N", EventModifiers::default().set_command(), s)),
        Menu::new("Edit"),
        Menu::new("View"),
        Menu::new("Help"),
        s
    )
}
}
In general, the easiest way to provide a sender is to use the menu_send modifier
of any IVP. Whenever the target IVP is visible, it sends the specified action
to the MenuReceiver. When it becomes hidden again, the corresponding action is unset.
#![allow(unused)]
fn main() {
// assume that we properly transferred the same channel as above
// to here
fn rabbits(new_mc: MenuChannel) {
  text("rabbits")
    // this will populate the appropriate menu receiver
    // with the given action
    // only whenever this IVP ("rabbits" label) is shown
    .menu_send(&new_mc, |_s| {
      println!("Creating new rabbit!");
    });
}
}
In some cases however, you may need more fine grained control.
In these cases, you can explicitly use the set method of the MenuChannel.
Make sure to call unset when the action is no longer needed.
Environment
First, we note that most projects can get away with using the standard environment entirely and that modification is only necessary in some niche scenarios.
Nevertheless, environments are another method for passing information. They come in two flavors: the constant environment and variable environment.
As a comment, for a given window all IVPs and VPs must be implemented with respect to the window's environment. Theoretically separate windows can have separate environment types, but this is uncommon.
Constant Environment
The constant environment is context that is passed to the entire view hierarchy
of a window. This can be used to pass references to bindings, menu channels, portals,
color schemes, and anything else you find relevant. Note that the value of the
constant environment is specified in the root_environment() function of your
Environment implementation.
The main way the constant environment is used is in the into_view_provider function.
Namely, whenever a struct is converted into a view provider, it can use the constant
environment freely. This way, you do not have to have the caller of the IVP explicitly
provide you with e.g. the MenuChannel, but can instead query it during conversion time.
A final note is that despite being called the constant environment, it's theoretically possible to change it over time (but it will still be observed the same by all views for any given timestamp). However, this is recommended against and may cause logical errors.
Here's a (snipped) section of Quarve's library code where we take advantage of the constant environment to gain access to the appropriate channels that we need. In particular, for each page of a TextView, we need to be able to respond to events such as select all.
#![allow(unused)]
fn main() {
fn into_view_provider(self, env: &E::Const, _s: MSlock) -> impl ViewProvider<...> {
    // use the standard env to find the appropriate menu channel
    // that a page needs to respond to
    let env = env.as_ref();
    PageVP {
        /- snip -/
        select_all_menu: env.channels.select_all_menu.clone(),
        cut_menu: env.channels.cut_menu.clone(),
        copy_menu: env.channels.copy_menu.clone(),
        paste_menu: env.channels.paste_menu.clone(),
    }
}
}
Variable Envrionment
While the constant environment is uniform throughout the view tree, the variable environment can be changed for certain subtrees. You can think about it as each view in the tree has its own copy of the variable environment personalized to itself (of course, this is not how it is actually implemented for efficiency reasons).
This is useful because it allows you to configure settings for only portions
of the view hierarchy. For instance, the .text_size modifier is actually an environment
modifier that sets a special variable in the environment to the specified size.
Then, text related views in this subtree read this value from the environment
and consequently render their text appropriately. This highlights how variable
environment modifiers allow you to give information to many views at once,
which is much nicer than manually specifying the text size for every single
label, in this example.
#![allow(unused)]
fn main() {
fn var_env_example() -> impl IVP {
    vstack()
        .push(text("rabbit"))
        .push(text("bunny"))
        .push(
            text("strawberry")
                // explicitly override the parent environment modifier
                .text_size(20)
        )
        // set the text size for this entire subtree
        // note that vstack is not even text related,
        // but we can still apply the modifier here!
        .text_size(14)
}
}
Advanced: You can write your own environment modifier by implementing the
EnvironmentModifier trait. These work by having methods to apply the changes
of this modifier to the environment, and a corresponding one to undo the changes
(thereby restoring the environment to its original state). To actually use the modifier,
call .env_modifier(<your modifier>) on the target IVP. Of course, feel free to
create a convenience modifier to simplify the syntax.
Etc
Here are other concepts in Quarve that did not fit into any of the other lessons
Modals
You can run a message box with a callback with code similar to this:
#![allow(unused)]
fn main() {
MessageBox::new(Some("Confirm Deletion"), None)
    .button(MessageBoxButton::Cancel)
    .button(MessageBoxButton::Delete)
    .run(|b, s| {
       println!("Pressed {:?}", b);
    });
}
Somewhat similarly, you can open and save files with OpenFilePicker and SaveFilePicker
#![allow(unused)]
fn main() {
pub fn open_file_ex() {
    // and similarly for SaveFilePicker
    OpenFilePicker::new()
        .content_types("png")
        .run(|path, s| {
            println!("Selected {:?}", path);
        })
}
}
Event Loop
Run a function on the main thread, possibly in the next event loop.
#![allow(unused)]
fn main() {
// if the current thread is main, it will run instantly
// otherwise, it will run on the next event loop
run_main_maybe_sync(|_mslock| {
    println!("Maybe called synchronously or next event loop,\
              depending on calling thread");
}, s);

run_main_async(|_mslock| {
    println!("Called on next main loop");
})
}
Window
Here is code for spawning another window besides the main window.
#![allow(unused)]
fn main() {
fn new_window(s: MSlock) {
    with_app(|app| {
        // where MainWindow is the window provider you want to use
        app.spawn_window(MainWindow, s)
    }, s);
}
}